We at Wyestitch specialise in Embroidery and T shirt Printing in Hereford, Uk for local businesses and people in the Herefordshire area, Wye Valley and south west England and South Wales.
Personalise your own workwear , garment or T-shirt with our Online Designer software.
Need Any Help? - Just contact us and let us take all the pain out of any search! We are only too happy to help find what you need.
NEED SPECIAL PRICING?
CONTACT US DIRECTLY IF YOU HAVE AN ORDER OF MORE THAN 20 GARMENTS OR OVER £250
WE WILL OFFER YOU EXTRA DISCOUNT!
CONTACT - Tel- 07851987518 or sean@wyestitch.co.uk
OPENING TIMES- MONDAY - FRIDAY 9.30am to 5.30pm
WE WILL AIM TO BEAT OR MATCH ANY EMBROIDERY DEAL OR BUNDLE
WE CAN OFFER TRADE AND CONTRACT EMBROIDERY
NO MINIMUM ORDERS
We offer the following services in-house:
Garment Decoration,
Garment Printing,
Garment Embroidery,
Corporate Workwear,
Safety Equipment and footwear,
HI Viz, and Specialist Wear,
Colleges and Sportswear,
T shirt printing ,
Sublimation Printing,
Transfer printing,
ID card Printing,
Lanyard and Ribbon Printing,
Bespoke Corporate and personal Giftware,
Giclee printing up to A1/24"
Gift and Souvenir Manufacturing,
Online Design service.
We can create and produce bespoke gifts and a wide range of Promotional items. Please contact us if you can't find what you are looking for.
We are only too happy to help and to find and suggest garments suited to your needs and budgets!
Wyestitch - Embroidery and Garment Printers in Hereford, UK
Tel 07851987518
Email - sean@wyestitch.co.uk
Giclee Petit Ltd T/a Wyestitch
Trading Address- Unit 8, Ravenswood Court, Rotherwas Industrial Estate, Hereford, Hr2 6jx
Company Reg- 11758433
Registered Office- 2 Acacia Close, Hereford, Hr2 6bp
VAT No- 369 6536 45
EORI- GB071920325000
Deconet Members-
Connect to us by Outsource ID : 13734343
OUR STORY
It all started as many great things start, in the former garage next to our house in 2020 in Hereford. .Following redundancy at the start of COVID, my wife Kasia suggested we start from scratch an embroidery and printing business together.
With husband Sean with a background of Large Format Printing and Kasia with a background in embroidery and as a trained Seamstress ,it seemed a great idea to start our own embroidery and printing business together as a Husband and Wife Team.
Things started slowly , selling to friends and few small businesses, however before we knew it we were fulfiling many orders to many companies, small and large businesses around Herefordshire.
With a philosophy that whether its a just a small order or a large one, and with no minimum quantities, we would always try and offer the best value and service around. We have constantly benchmarked our prices against all the major internet brands and we know today that not only do we compete, but that we can often beat with our huge range on offer and extremely competitive prices .
We have now upgraded to our new premises and Workshop in Rotherwas Industrial Estate in Hereford with two of the latest production DTF printers and Embroidery machines, and with now over a thousand customers in the Hereford area alone we offer an unparalled service and quality at the best possible value.
Come talk to us whether you are a sole trader,just holding an event, a small or large business and let us help you with whatever your garment needs are.
Can I order samples?
Yes, samples are available for all our products. Please note that we require full payment for samples before they are shipped. Contact us directly.
Can I customise my own goods?
We do allow- Please note these are subject to our Standard T&C's and a standard Disclaimer form. However We may also have what you are looking for, so please contact us to discuss by sending us an email to sean@wyestitch.co.uk . We have alot of access to brands not shown on our website as we have just too many to show.
Do you supply one-off customised garments?
Yes, we do supply singles in most cases, but do bear in mind that no quantity discounts for either the garment or customisation apply. The cost of one garment is shown on the respective product page.
Do you supply plain non-branded clothing?
Yes, all of our clothing is available plain or with customisation.
How much does customisation cost?
Our customisation prices can be found on individual garment pages on the website: simply click on the Online Designer - Design Your Own Online, then choose ‘Embroidery’ or ‘Print’. Please note that for embroidered items, a complex design may exceed the standard stitch count for our small and large logos. If this is the case, we will contact you to discuss your design.
I don’t have any artwork to give you for customisation, can you help?
Yes, we have a design and artwork studio which will be able to either produce artwork according to your brief. There may be a small charge for this service and this will depend on the complexity of your requirements.
Can you embroider my logo or design on my garments in different sizes?
Yes, certainly, but for each different size you’d like your artwork reproduced, we need to make a separate embroidery file, for which there may be a charge.
Can I get a proof of my design?
We can offer a free proof of your design if you use our Online Designer- Design Your Own Online tool. If you require embroidery by doing so it will incur an artwork digitisation creation fee as we will need to create the artwork required for our embroidery processes. For all embroidery orders, we will supply an artwork sample before the purchased garments are embroidered to ensure you approve of the design. We will require this approval before producing the embroidery file and customising your garments.
Which artwork format is best?
We can accept a variety of file formats including an AI, EPS, PSD, Vectorised PDF & PNG at size . If you would like your design printed, we recommend sending a high-resolution file. If the file sent is low quality, it may need to be re-drawn and revectorised adding an additional fee, but we will let you know if this is the case. When supplying artwork, please specify any CMYK or Pantone-matched colours you would like to use. We can try and match this in both embroidery and printing processes. If you have any other questions regarding artwork, please contact us.
Will I have to pay for artwork creation more than once?
Each logo that is converted to an embroidered design needs to be digitally recreated into an embroidery file, which is then saved on our system. This means you will incur the artwork creation fee only the first time you use the design. For printed garments, we also retain your artwork on our system.
Can I be invoiced for my order instead of paying up front?
As a standard policy we ask for payment of the full invoice amount before garments can be customised.
How can I specify the correct sizes for my garments?
Each product page on our website specifies the range of sizes that product is available in, including how they correspond with standard men’s, women’s sizes and children's sizes. We recommend that you ask the people who will be wearing the garments (if possible) to tell you what size they need. Check and sse the guide Chest sizes on each garment rather than size Medium or Large etc as each manufacturer varies slightly in each of their specifications.
How long will my garments take to produce?
Please allow time for us to produce and despatch your garments especially at peak periods. Normally we aim to produce within 5-7 working days after receipt of funds, but please note with the current market conditions we are experiencing stock delays from certain brands so best always to check with us directly availability. If you do need your garments faster, it’s always worth contacting us to see if can satisfy your request. However, this may incur additional costs.
How much will my garments cost to deliver?
Delivery costs are available on check out. We normally deliver by First class tracked Royal Mail small items and larger deliveries by DPD.
Most customers are offered a standard Collect policy and are notified as soon as products are ready.
What is your returns policy?
We cannot accept embroidered or printed returns, as we will not be able to re-sell them, or return them to the manufacturer. Naturally, if there is a fault with your product, we will investigate on a case-by-case basis. If you have ordered non-customised garments, we can accept returns if they are in a resale-able condition. Items maybe subject to a handling fee to return to warehouse.
We like to make sure our customers are getting the best deal.
If you happen to find a cheaper price elsewhere, we’ll try our best to match it!
Please note that Price Match is offered subject to the satisfactory submission of supporting information and is only valid when formally accepted by The Company. Permission may be refused entirely at The Company’s discretion.
The important part
Here is some handy important information you should know about our Wyestitch price matching.
Unsure on what size to have your artwork printed or embroidered on your garments?
While we do have recommended sizes, the size of your logo is quite personal/subjective. Some want something small and subtle, others want their logo to be seen from far away.
Large Logo / Design – For large print coverage (eg. big print across the chest or back of a t-shirt) we recommend having your design 260-280mm wide . This print size will fit on most adult t-shirts both male and female, making it a good go-to size. We print most adult large prints at this size.
We wouldn’t suggest having embroidery this big, as it’ll feel super heavy. For embroidery 200-240 mm is large ! If it has too many stitches it also becomes very expensive - so keep it simple when it comes to a design
Small Logo / Design – If it’s a small subtle left breast print/embroidery or similar, 70-100mm is generally a good size to have your design. Simple designs will allow for 70mm width, but those with more intricate elements may need to go as large as 100mm to ensure the design comes out clearly.
If the garment is being worn next to the skin- like a T shirt or Polo we dont reccomend a large embroidery on the back. Whilst it can be fine on the front for Heavy T shirts ( minimum 165gsm & above) we would recommend if you want a logo on the back print it otherwise a heavy design on the back can rub against the skin. !
ARTWORK GUIDELINES
To avoid unnecessary charges and delays and to ensure you receive the highest quality result please read our artwork guidelines below...
Adobe Photoshop & Adobe Illustrator can be used for PNG file output. Adobe Illustrator should be used for vector PDF file output. Please ensure there are no faded or semi-transparent areas in artwork and that your designs are made of solid colours.
File Requirements Checklist:
Please avoid poor quality pixelated artwork, faded edges, drop shadows, glows and transparencies. Any pixelation will come out worse when printed than it looks on screen. You’ll find our transparency guide here.
Anything in the file will be printed so ensure that the background is clean of any stray pixels.
Please note on small order volumes (less than 100) Pantone matching isn’t generally possible – we’ll endeavour to print as close to your artwork colours as the process allows.
Adobe Illustrator Files-
8 tips to ensure your artwork is printed correctly.
1)Set colour toPantone coloursettings.
2)Artworksized to actual print dimensions(maximum print size 340mm x 480mm). The maximum print size onmost womens garments is 250x300mm so please scale all artwork smaller if printing onto womens garments &mens.Our most popular (and recommended) print size is 297mm wide, and most popular embroidery size is 100mmwide.
3)Artworkin the colours you want it printed(don’t worry if it’s white on a white background we’ll find the design).
4)Check allspellingis correct
.5)Anything in the file will be printed so ensure that the background isclean of any stray pixels.
6)Ensure your artwork is inVector format.
7)Ensure your text has beenconverted to outlines.
8)Ensure anything you don’t want printed is cut out/transparent, for example if you’re printing a white design onto ablack t-shirt, any areas you want filled with black will need to be cut out, as opposed to being filled with black colour(as we generally cannot print black onto black).Please note with some production processes Pantone matching isn’t possible – we’ll endeavour to print/embroideras close to your artwork colours as the process allows in these instances.
Please avoid poor quality pixelated artwork, faded edges, drop shadows, glows and transparencies
Photoshop Files-
8 tips to ensure your artwork is printed correctly.
1) Transparent background (make sure that areas you don't want to print are transparent).
2) RGB colour settings.
3) Minimum of 150dpi (we advise 300dpi for best results).
4) Artwork sized to actual print dimensions (maximum print size 400x500mm). The maximum print size
on most womens garments is 250x280mm so please scale all artwork smaller if printing onto womens
garments & mens. Our most popular (and recommended) print size is 280mm wide, and most popular
embroidery size is 85mm wide. for Left Chest logo
5) Artwork in the colours you want it printed.
6) Check all spelling is correct.
7) Anything in the file will be printed so ensure that the background is clean of any stray pixels.
8) Crop the page/artboard around your design.
9) Save as PNG.
Please note with some production processes Pantone matching isn’t possible – we’ll endeavour to
print/embroider as close to your artwork colours as the process allows in these instances.
What are raster and vector graphics, and how do they differ from one another? These are questions that customers often pose when encountering image-related techniques that don’t fall within their usual spheres of knowledge. The answers are, well, technical, but of interest to many in the world of textile printing. This is a guide to help those who would like to learn more about image file types and about how using them correctly can lead to better products. We hope it will be of help.
The source image
The source image, i.e. the image of the customer’s logo that the printer needs to create the accompanying proof, is an important element for any textile printer. Not on account of its contours and color composition, but because of its file type. The question we have to ask ourselves and our customers every time a new image lands in our inbox is: Is it raster or vector?
Why is that? Because while raster files are usable as source image for textile prints, they are saddled with so many disadvantages that vector files are to be preferred in almost all cases. The fundamental reason why by far the most printers — Wyestitch among them — recommend their customers to submit images in vector format as the simple one that they yield better results. Why? Lets find out by examining the two formats’ advantages and disadvantages.
Raster
A raster image is modelled by a two-dimensional Cartesian coordinate system in which so-called ‘pixels’ are placed to together comprise the image. Each individual pixel is equipped with a color and a unique set of coordinates that precisely specifies its place on the grid. From there the pixel’s color engages in a kaleidoscopic collaboration with the surrounding colors, together comprising the complete image.
Any individual pixel is but an otiose, square color fragment. But place a multitude of these otherwise charmless quadrates into sufficiently fine-meshed patterns, and almost boundlessly beautiful, vivid, and elaborate mosaics can emerge. In the RGB color model – the color model raster files typically use – any given pixel can be equipped with one of no fewer than 16,777,216 different colors. Photorealistic images are always raster graphics, as co-acting pixels can produce compositions and color gradients no other image formats or color models can match. Another advantage with raster is that images are editable at a much more atomic level with software like Photoshop. It’s unusually tedious and time-consuming – and consequently almost never done – but with enough skill and patience a graphic designer can in principle edit a raster image all the way down at the level of the individual pixel.
The number of pixels of which a raster image is comprised determines its quality. This corollary bears the term ‘image resolution’ and is the deciding factor in how an image is interpreted by the retina. The more pixels, the clearer it appears (up to the eye’s biological limit, which – dependent on context – is about 300 PPI at a distance of about 2.5 feet). The density of the pixels is tallied as PPI or ‘pixels per inch.’ Let’s illuminate further with a concrete example:
If we want to print an image with a PPI of 240 – which is the lowest pixel density suitable for textile printing – onto a textile area with a width of six inches, we multiply the values and get: 240×6=1440. Thus, the raster image must have a width of 1440 pixels to be usable across the desired area. We can also move the variables around and determine the maximum size in which the raster image can be printed: If we have an image with a width of 1440 pixels and know the pixel density must not subceed 240, we divide the numbers and get: 1440/240=6. Hence, the raster image can be printed with a width of six inches before losing quality.
So far, so good. But the raster format’s weakness – and the knock-down argument against its employment for printing purposes – is its fixed pixel count. Once a raster image has been created comprising a certain amount of pixels, that fundamental composition is immutable. So if we find ourselves wanting to manufacture a logo with a width of e.g. eight inches – and want to keep its incumbent resolution – we require a larger pixel count than the image has.
Let’s again get out the calculator: 240×8=1920. We require 1920 pixels in the width for the new, larger image but have only 1440. So if we print the logo, it will emerge with a pixel count that fits an area 25% smaller than prescribed by the resolution. Each pixel is now stretched to cover a larger area and consequently appears duller and blurrier than before. Since logos often must come in varying sizes – the size of a logo on the back typically differs from that on the chest – a graphic designer needs to work with images that allow for easy handling and augmentation. This remains especially true if the logo contains a font that – as you can imagine – pays a disproportionate price for loss of quality. It doesn’t take many grainy pixels before a text ceases to be legible. For this reason all fonts on the internet – where users will often zoom in and out on a text they’re reading – uses the vector format.

A related factor that similarly works against the raster is the file size. An image’s pixel count is directly reflected in its size. Independent of PPI that – as you recall – is an expression of pixels per inch, the file size scales proportionately with the total pixel count. Two images with identical PPI but different dimensions will have different file sizes. Since the image editor software must be capable of handling data pertaining to an image’s every pixel, the file size will greatly influence the speed with which the program can process the image. The more pixels, the better the image quality. The better the image quality, the larger the file. The larger the file, the slower the processing and the quicker the hard drive fill-up. Size will additionally tend to be a retarding influence on the transfer of files from one system to another.
Vector
The vector file is based on mathematical formulas that calculate and draw precise geometric elements in a coordinate system. They are drawn through calculations of exact point values and their connection with lines and curves that together comprise the full graphical expression. Such geometric building blocks – lines, circles, polygons, curves etc. – make the vector file well-suited for use within structure-based line graphics, which typically deals with 2D images with clean features and homogenous, flat colors. The same building blocks simultaneously make the vector file unsuited for the realistic renderings often seen in digital photographs, as flat colors lack precisely the color depth crucial to image realism. An important characteristic of the vector file is that it – unlike the raster file – isn’t required to manage millions of pixels but only has to remember a few coordinate points and the line equations that connect them. Because of this the vector file takes up significantly less space and is easier to transfer, move around, and work with.
Let’s again illuminate with an example: If we want a circle to be rendered by a raster image, the image will have to manage several million binary digits (bits) and deal with the accompanying file size. A vector file, on the other hand, has it much easier. With just two digits, it first finds the circle’s center in the coordinate system and then determines its circumference by adding the radius value to the circle equation: (x-a)2+(y-b)2=r2. These values are all the vector file needs to draw the circle. Should we then want to enlarge it, the vector file simply replaces the radius value with a new one and draws the result of the new calculation. This much easier method requires very little disk space and permits infinite enlargement without concomitant deterioration of the resolution. The line edges will always look sharp and the image appear – and technically be – brand new.
That the image is redrawn every time it is altered or enlarged means that it can be divided into individual components. These can be separated, arranged, modified, and colorized as needed with just one or very few clicks. A graphic designer can make them any size, they can continually be assigned any Pantone color number, and their simpler compositions ultimately make them easier to apply to the textile. A vector file is accordingly much more versatile and easier to work with than a raster file. What it lacks in photo realism, it makes up for in responsiveness, and in an industry where looming deadlines are the rule rather than the exception, the importance of fast and flexible image editing cannot be overstated.
Identify your image’s file type
What file type is the image you hope to use as source for your logo? Find out by looking at the file extensions or by enlarging the image and seeing how it affects the quality. If it is worsened, it is very likely a raster file.
The most common raster file formats have the extensions .jpg, .gif, .bmp, .png, .tiff, .tif and .psd (Photoshop), while the most common vector file formats have the extensions .eps, .ai, .cdr, .svg, and .wmf/emf.
Summary
Let’s tie things up by recapitulating what we now know about raster and vector:
Both file types possess clear advantages. Raster is the preferred file format for realistic and colorful image renderings, while vector is the domain of the utilitarian, undemanding facsimile. Raster is used for photographs and is by far the most used image type on the internet, while vector is widely used in the design of logos with an eye toward marketing. Raster is luxurious, but demanding. Vector is ascetic, but smooth. Raster is a Gustave Courbet painting. Vector is an Albert Uderzo drawing. In the textile printing industry, option number two is preferred, reliably gifting us the shortest production cycles, the most inexpensive logos, and the happiest customers.
EMBROIDERY
Embroidery provides an elegant, professional expression a heat transfer or screen print just can’t match. Even when mass-produced, an embroidery’s stitches are never completely the same from unit to unit. This grants the logo an exclusive, hand-made look that oozes quality and value.
You can provide us with a new design or purchase from our large selection of existing logos. Existing logos can be altered and custom-made per your needs. Up to 15 colours can be used in a single design.
While embroideries of course must look as well-made as possible, they must be maximally durable, too. That’s why we always use a strong polyester thread capable of withstanding industrial washing, heavy detergents, bleaching, chlorine, and stonewashing. It will always be the best choice for workwear, bed sheets, children’s clothing, outerwear, swimwear, towels, and other fabrics regularly bleached and exposed to strong chemicals.
The digitized logo is sent to you in proof form, letting you see how the finished product will look. We don’t begin before you’re happy and have approved the proof.
Many suppliers buy their products from external sources, which means losing a grip of quality control. At Wyestitch we manufacture our own embroideries on our own machines.
The first step is always the biggest, and the first step on the way to a perfect embroidery is the digitization of the logo. When Wyestitch digitizes your logo, we factor in the fabric onto which it is to be printed and in what environment it is to be used. When the logo has been digitized, we stitch and adjust until it is perfect.
Not all fabrics are created equal. A design embroidered onto one type of polo shirt needs a quite different design composition than one embroidered onto an Oxford shirt. At Wyestitch we sew a test embroidery and adjust as needed to ensure the best possible result.
Not all embroidery threads are created equal. Some cheap threads cannot withstand repeat washing or tumble drying. Many printers producing large embroidery batches choose the cheap way out in the shape of nylon threads instead of the excellent polyester threads. At Wyestitch we exclusively use polyester threads for our embroidery solutions. We also make sure to match the thread weight and the colour to best possible.
The above are just some of the reasons Wyestitch has built a large customer portfolio in the Hereford area and understands the importance of image management and branding.
********
While 30,000 year-old embroidery vestiges with traces of hand-made embellishments have been found, the oldest established embroiderers are of Scythian origin, dating to approximately the 4th century BCE. Among the most famous, surviving examples are the imperial courtrobes from the Qing dynasty (1644-1911). The fundamental materials and techniques utilized in Antiquity are the same as those used today, placing the embroidery among the rare technologies invented perfect.
The embroidery is the most durable of all textile embellishments. As the embroidery consists of threads sewn directly into the fabric, and as these are almost always newer and stronger than those of which the fabric already consists, the longevity of the embroidery is solely limited by the fabric itself.
The threads’ robustness and durability further enable them to retain their colors throughout the fabric’s lifetime and preserve their brightness through even numerous boil washes and chlorine treatments.
With its strong seams and close threads, the embroidery is minimally stretchy and thus has the heaviest ‘hand’. An embroidery can always be felt by the fingers and in some cases — if applied to clothing — against the body.
Threadweight is indicated inversely. A low thread weight implies a heavy, thick thread, while a high thread weight implies a thin, fine thread. The scale runs broadly from 20 wt to 80 wt, with 40 wt roughly being the industry standard. Individual stitches must be no less than 0.8 mm long and Sans Serif fonts no less than 4 mm tall.
Embroidery is an additive method of manufacture, producing very little waste. Planning and process optimization ensure that materials are used only where needed, resulting in significant resource preservation and cost reduction.
Modern, industrial embroidery is a mix of thousand-year-old sewing techniques and advanced electronic mechanics. The old-fashioned, texture-building sewing technique, by which patterns and colors are drafted onto textile surfaces by hand-sewn threads, are by the latest technology, LCD Touch Screen Displays, precision sewing, and intelligent tensioner systems promoted to a state-of-the-art instrument that gives exquisite logos for branding and other value-creating PR.
By far the most industrially manufactured embroideries today are made by digitized embroidery machines. Custom-made software dubbed DST files (Data Stitch Tajima, after Tajima Group, which initially developed the file type) contains digital instructions for which patterns and stitches are to embody the embroidery. These are read and employed by the machine to manufacture striking, consistent products.
We run a combination of single Head and Twin Head machines based on DST file format
DST-files are created through embroidery digitizing, a process by which illustrations are converted into a program the embroidery machine reads and converts into patterns and stitch types. These illustrations typically consist of either customer-submitted files or images we ourselves have created from scratch. For this, we prefer working with vector files rather than raster files.
Wyestitch will always endeavour to supply any particular garments / fabrics specified by the customer. Where these are unavailable, however, Wyestitch reserves the right to substitute with garments / fabrics of a similar quality or size. In the event that we apply substitutes to your order we may contact you to discuss the options, including any difference in price to the original order.
While we do everything we can to ensure every product arrives in a pristine condition, including rigorous quality control, in some rare cases you may find small marks on your products.
As a sustainable company, we try to avoid the use of plastics where possible and our manufacturers do the same. As a result, keeping something like a white T-shirt perfectly pristine when travelling through multiple factories and machines both internationally and in the UK is a challenge. It’s hard to believe, but, we even find that marks can come off the inside of the boxes that the products are shipped in.
While large stains and marks are generally unacceptable, very small blemishes to the fabric are sometimes unfortunately unavoidable. This is particularly the case with white items. This is the same anywhere unless plastic bags are used across the entire supply chain to keep the items protected at all times. And even then with the number of hands and machines a garment touches before it reaches the end-user there is still a chance of small marks or blemishes.
This is less of an issue on coloured items, where small marks are far less noticeable.
We supply a number of luxury brands , that are exposed to the exact same problems. With this in mind, it’s important to understand this is a perfectly normal part of clothing production and is the industry standard.
In some instances, you may find a rogue loose thread on your products. Firstly, don’t panic. Often, what looks like a loose thread is actually just a bit of excess thread that can easily be removed from the garment by hand, and has no impact on the integrity of the product.
It’s only normally a problem when the thread has come away from the product, resulting in the item no longer being stitched together. At this point, the integrity of the garment is compromised. If you have this problem on a product within your order, please get in touch with us.
ONLINE DESIGNER HELP (DESIGN YOUR OWN)
The Designer is an easy to use tool that allows you to design your own product. You can select a product to decorate with stock art, your own designs or photos and text.
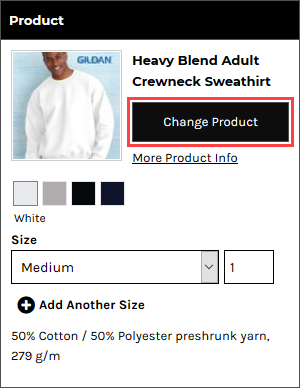
To change the currently selected product:
- Click on the Change Product button in the Product panel.
The Select Product popup will be displayed.
- Click on a product to select it.
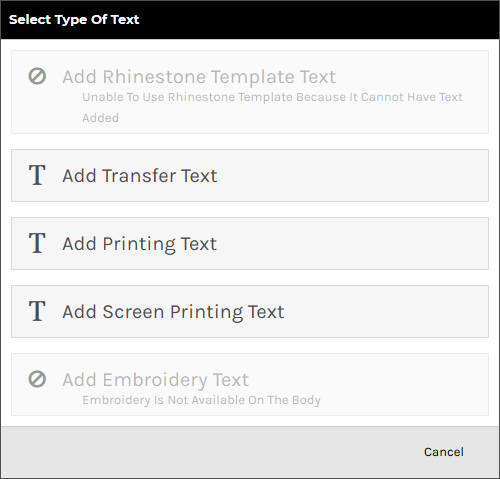
To add text to a product:
- Click on the Add Text button in the Designer Toolbar.
- Select the type of process to be used for the text in the Select Type of Text popup. Only options that are supported by the product being decorated will appear.
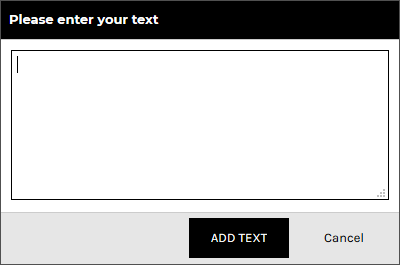
- Enter the text, and click ADD TEXT.
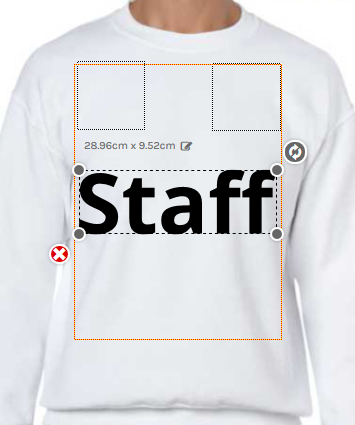
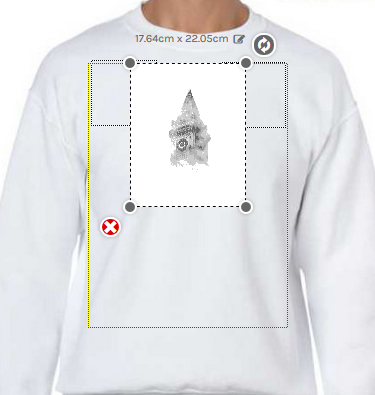
The text will appear inside the decoration area in its bounding box with editable size dimension, resize and rotate handles and delete control available.
To adjust text properties:
- Click on the View and organize layers button in the View Toolbar.
- Click the text object you wish to adjust the properties of.
The Text Properties panel will appear on the left side of the Designer.
- Configure the text as required:
- Text Box: lets you edit the text.
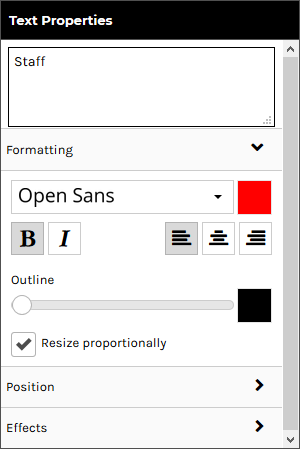
Formatting
The Formatting tab is expanded by default and contains the following controls:
- Font: change the font via the Select A Font popup.
- Font color: change the text color via the color popup.
- Bold: boldens the text.
- Italics: italicizes the text.
- Left-align: aligns text to the left when it spans multiple lines.
- Center-align: center-aligns text when it spans multiple lines.
- Right-align: aligns text to the right when it spans multiple lines
- Outline: lets you apply an outline to the text. At the leftmost position on the slider, no outline is applied. Moving the slider to the right applies an outline that increases in thickness the further right it is moved.
- Outline Color: lets you set the color of the outline via the color popup.
- Resize Proportionally: when this checkbox is ticked, the text will keep its original proportions when you resize it.
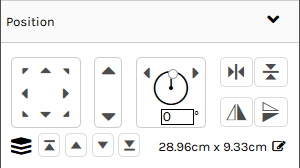
Position
Effects are only available for the direct to garment printing decoration process.
Click on the Position tab to expand it. Expanding the Position tab reveals the following controls:
- Position controls: lets you move the selected text within the decoration area using any of the eight directional arrows.
- Size controls: lets you increase/decrease the size of the selected text by clicking on the up/down arrows.
- Rotation controls: lets you turn the selected text around its center axis. You can do this by:
- Specifying a specific angle at which to rotate the text.
- Clicking on the left arrow to rotate the text 5 degrees to the left.
- Clicking on the right arrow to rotate the text 5 degrees to the right.
- Horizontal Centering controls: Horizontally centers the selected text within the decoration area.
- Vertical Centering controls: Vertically centers the selected text within the decoration area.
- Layering controls: lets you change the layer at which the selected text is positioned in relation to other decorations.
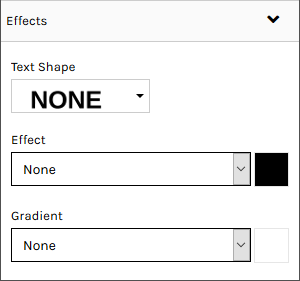
Effects
Click on the Effects tab to expand it. Expanding the Effects tab reveals the following text effects:
- Text Shape: lets you alter the shape of the text. The options indicate the shape that they will apply.
- Effect: lets you add a shadow or glow effect to the text.
- None: no effect is applied.
- Shadow: applies a drop shadow to the text.
- Offset: lets you set the position that the shadow will be offset from the text.
- Blur: lets you set the level of blurring effect that will be applied to the shadow.
- Glow: applies the appearance of a glow around the text.
- Strength: lets you set the intensity of the glow.
- Blur: lets you set the level of blurring effect that will be applied to the glow.
- Effect Color: lets you set the color of the Effect via the color popup.
- Gradient: sets a horizontal or vertical gradient of color between the selected font color and the gradient color.
- Gradient Color: lets you set the color of the Gradient via the color popup.
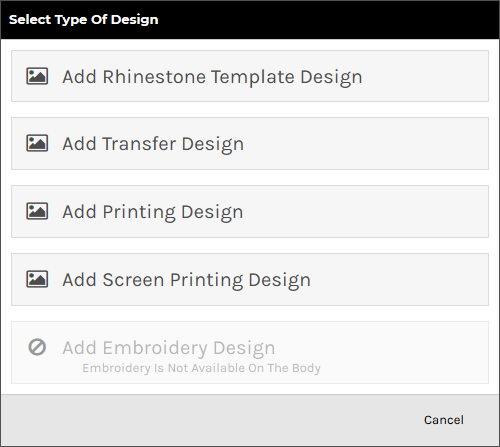
To add a design using the Add Design button:
- Click on the Add Design button in the Designer Toolbar.
- Select the type of process to be used for the design in the Select Type of Design popup. Only options that are supported by the product being decorated will be enabled.
- Browse to and click on the design you want to add in the Select a design popup.
You can select designs from the following sources:
- Upload a new design: Click on Upload Image to upload a design from your device.
Raster, vector, and embroidery file types are supported in the formats as listed below:
- Raster (PNG, JPG, JPEG, GIF, TIF)
- Vector (CDR*, PDF, EPS, PS, SVG, SVGZ)
- Embroidery (EMB)
Vector based graphics will have modifiable elements such as text and colors editable on the fly by users.
*CDR requires the CorelDRAW app to be enabled. When a CDR file is uploaded it will be automatically converted to SVG format so that it can be modified in the Online Designer.
- Your own previously uploaded design designs: These will appear under the Upload Image button if you have uploaded designs before.
- Instagram: Click on the Instagram button and enter your credentials to access your Instagram pictures.
- Facebook: Click on the Facebook button and enter your credentials to access your Facebook pictures.
- Store Designs: designs exclusive to the store.
- Stock Designs: Third-party designs available for use in DecoNetwork.
- Click SELECT DESIGN.
The design will appear inside the decoration area in its bounding box with editable size dimension, resize and rotate handles and delete control available.
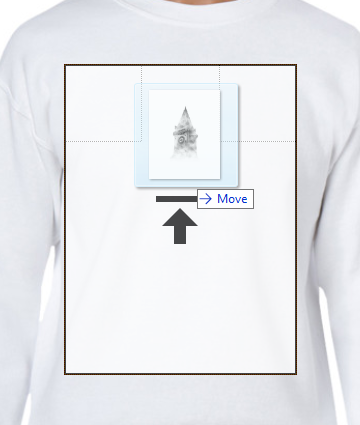
To add a design by drag and drop:
- Drag a design file from your computer into the decoration area of the product in the Designer.
The decoration area will be highlighted when the mouse pointer is within its boundaries.
- Release the mouse button to drop the design into the decoration area.
The Select Type of Design popup will be displayed with the supported decoration types enabled for the product selected.
- Select the decoration process you want to be used for the design.
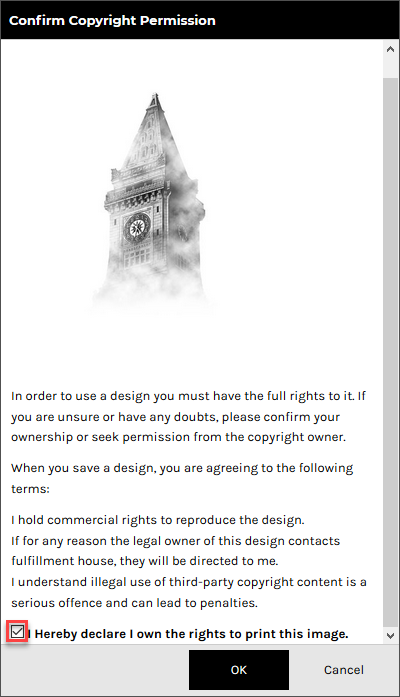
The system will begin uploading the design file to your own design library.
- Tick the, I hereby declare I own the rights to print this image, checkbox in the Confirm Copyright Permission popup to verify that you have permission to use the design.
- Click OK.
The design will appear inside the decoration area in its bounding box with editable size dimension, resize and rotate handles and delete control available.
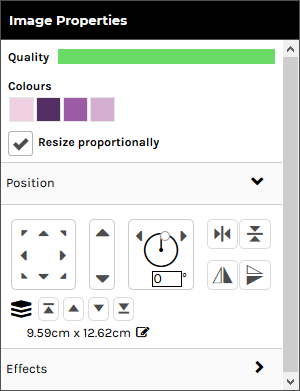
To adjust design properties:
- Click on the View and organize layers button in the View Toolbar.
- Click the design object you wish to adjust the properties of.
The Image Properties panel will appear on the left side of the Designer.
- Configure the design as required:
- Quality: Shows you a bar indicating how clear the image is for printing. The indicator reflects how well the raster-based graphic is going to print before blurring too badly. If this drops below a certain threshold, the system will warn the customer that their print quality will be compromised.
This option is only available for raster designs.
- Colors: Shows you the colors currently used in the design.
- edit: Click on the link to edit the design colors.
This option is not available for designs that have restrictions on customizing.
- Resize Proportionally: when this checkbox is ticked, the design will keep its original proportions when you resize it.
This option is not available for embroidery, transfer and rhinestone designs.
- Ungroup: click on the link to ungroup the design into its component elements.
This option is only available vector-based designs.
Position
Click on the Position tab to expand it. Expanding the Position tab reveals the following controls:
- Position controls: lets you move the selected text within the decoration area using any of the eight directional arrows.
- Size controls: lets you increase/decrease the size of the selected text by clicking on the up/down arrows.
- Rotation controls: lets you turn the selected text around its center axis. You can do this by:
- Specifying a specific angle at which to rotate the text.
- Clicking on the left arrow to rotate the text 5 degrees to the left.
- Clicking on the right arrow to rotate the text 5 degrees to the right.
- Horizontal Centering controls: Horizontally centers the selected text within the decoration area.
- Vertical Centering controls: Vertically centers the selected text within the decoration area.
- Layering controls: lets you change the layer at which the selected text is positioned in relation to other decorations.
Effects
Click on the Effects tab to expand it. Expanding the Effects tab reveals the following controls:
These options are only available for raster designs.
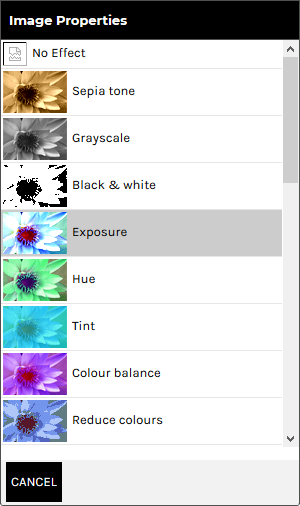
- Effects: lets you apply a special effect to the design that alters its appearance. Click on the Effects drop-down box to see the effects options.
Click CANCEL to return to the Effects Panel.
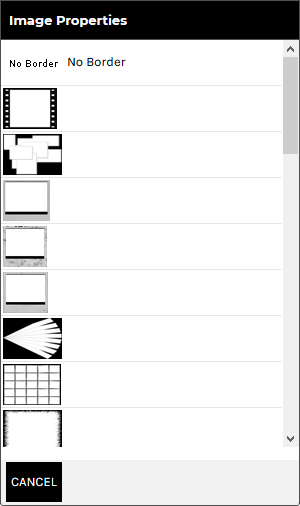
- Border: lets you apply a border to the boundary of the design. Click on the Borders drop-down box to see the border options.
Click CANCEL to return to the Borders Panel.
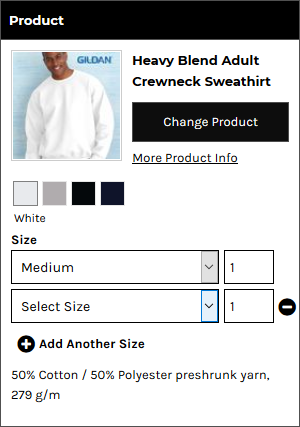
To specify product sizes and quantities:
- Click on the Product button in the Designer Toolbar.
The Product panel is displayed.
- Select a size from the Size drop-down list and specify the quantity required in the input box for that size.
- Click Add Another Size to specify quantities for each size required.
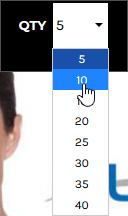
To specify product size and quantity when products are sold in bulk:
- Click on the Product button in the Designer Toolbar.
The Product panel is displayed.
The Quantity field will show the minimum quantity you can purchase.
Note, you can not select multiple sizes when products are sold in bulk.
- Select a size from the Size drop-down list in the Product Panel.
- Select a quantity from the QTY drop-down list in the Designer Toolbar.
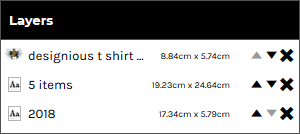
To arrange design layers:
- Click on the View and organize layers button in the View Toolbar.
The Layers panel is displayed showing all the text and design objects present in the decoration area.
- Arrange the elements as required:
- To move a layer up, click on the up arrow to move it to a new position in the list. Likewise, to move a layer down, click on the down to move it to a new position in the list.
- To delete a layer, click the cross icon at the right of the layer.
To re-group template design elements:
You can group elements from a template design that you have ungrouped.
- Click on the View and organize layers button in the View Toolbar.
The Layers panel is displayed showing all the text and design objects present in the decoration area.
- Hold down the Ctrl key and click on each layer you want to be grouped.
- Click on the Group Selected Items button in the View Toolbar.
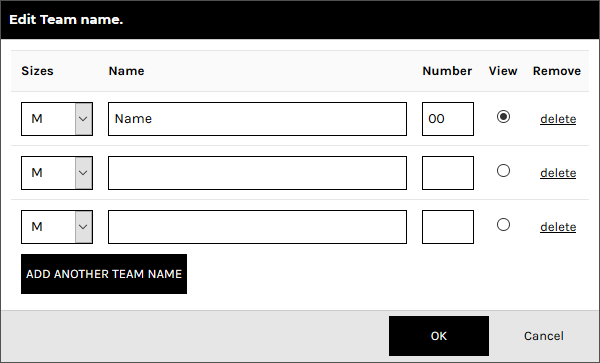
To add team names:
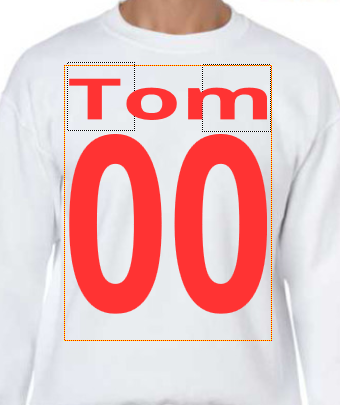
"Team name" allows automatic formatting of text in the form of a small name and large number beneath, decorated onto the product. This is useful for teams and other groups who would like a jersey-style name and number on their product.
- Click on the Add Team name button in the Designer Toolbar.
- Select the decoration process you want to be used for the team names.
The Add Team name popup will be displayed.
- Select a size and specify the quantity required for that size.
- Click Add Another Size to specify quantities for each size required.
- Click Next.
The Edit Team name popup will be displayed containing Name and Number fields to match the quantities specified in the Add Team name popup.
- Configure team names by entering the team name and number for each product to be decorated.
The item selected in the View column will be the item that is displayed in the Designer.
- Click Add Another Team Member and specify the team name and number for each additional product required.
- Click OK when done.
The team name and number will be set up on the product as text areas whose properties may be adjusted as per normal text, except that any changes made will apply to all team name products.
See the section, To adjust the properties of text in the Designer, above, for details on how to adjust the formatting, adjust the position and apply effects to the text fields.
- If you want to edit the teamnames and numbers, select a text area and click Edit teamnames in the Text Properties panel to display the Edit Team name popup.